
My Workflow to Publish a Blog Post via Email
This is a continuation of the previous post "Wordpress to Markdown and then on to 11ty". In this post, I'm going to cover the final step of publishing the post, once I've written it.
Recap #
First, a quick recap of where we are in this whole process.
- My old blog has been converted to 11ty and it's being served off Github and Netlify
- I now write my posts on https://stackedit.io. Works pretty well because it can also save my posts as backup and it has a nice editor.
- Any time I want to include an image, I just include the image link in the post.
Now that I have the post content, I just need a way to trigger an update in Github whenever I write a new post.
Email to Published Blog Post Workflow #
This is the workflow that I settled on:
- Write post
- Send blog post to an email address
- Process the blog post
- Commit changes to Github
- Netlify is triggered and publishes the blog post
There are plenty of tools that should be able to do this. If I keep the 'processing' part of things simple, something like IFTTT or Zapier should be more than enough. At least, that's what I thought.
Pre-processing the Blog Post using AWS Lambda Functions #
 Sometimes ....
 Turns out these services have pretty strict limits on how long JS functions can run. So my processing step would be quite simple and limited, not enough time to checkout code and push a commit to my Github repository. And forget about doing image processing by fetching the linked images in the blog post.
My backup option was to just go with an AWS Lamda function. I hadn't worked
with Lambda before, so I used the AWS SAM CLI to generate a serverless function
using one of the templates. The template.yaml looks like the following.
AWSTemplateFormatVersion: '2010-09-09'
Transform: AWS::Serverless-2016-10-31
Description: >
  Sample SAM Template for randomcoding-email

Resources:
  SESHandlerFunction:
    Type: AWS::Serverless::Function
    Properties:
      CodeUri: .
      Handler: app.lambdaHandler
      Runtime: nodejs16.x
      MemorySize: 256
      Timeout: 60
      Architectures:
        - x86_64
      Policies:
        - Statement:
            - Effect: "Allow"
              Action:
                - "s3:GetObject"
              Resource: "arn:aws:s3:::my-s3-bucket-name/*"
            - Effect: Allow
              Action:
                - "secretsmanager:GetSecretValue"
              Resource:
"arn:aws:secretsmanager:[region]:[ac-number]:secret:[SECRET]"
I then used ChatGPT to generate some basic code that does the following when a file is added to the specified S3 bucket - keep in mind that the file just contains an email body:
- Validate and process the email body and extract the post title and body
- Check out the Github repo that's hosting my blog
- Create a new file in the post structure with the correct title naming and add the post body
- Carry out post-processing on the post body like fetching images and making their paths relative to the post
- Add all the changes as a commit to the repo
- Push the changes to remote and clean up
I haven't cleaned up my code yet, so I'll post it once that's done. But this is the gist of it. Now I just need to find a way to convert my email to a file in an S3 bucket.
This turned out to be not too difficult.
Receiving Emails using AWS Simple Email Service (SES) #
A nifty feature that SES has is the ability to create an incoming email address and set up filtering rules for inbound emails. You can read more about that here: https://docs.aws.amazon.com/ses/latest/dg/receiving-email.html. Just make sure that the region you're using does support email receiving, this initially tripped me up before I noticed it during debugging.
Setting up is fairly straightforward:
-
Head over to SES and create an identity and verify it. Recommend you just use a custom domain.
-
Once the identity is verified, head over to 'Configuration' and select 'Email Receiving'
-
Create a new rule set and make sure you set the previously configured domain as the recipient condition
-
Add a new action to the rule so that any incoming emails are then forwarded to this S3 bucket
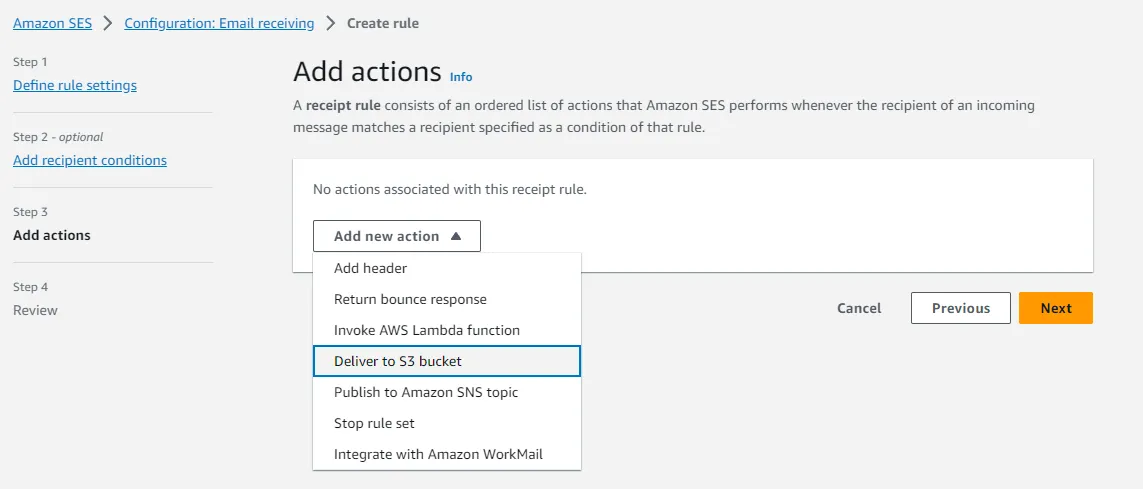 Setup inbound email and then direct it to an S3 bucket
Detailed instructions can be found here: https://repost.aws/knowledge-center/ses-receive-inbound-emails
Now We're Cooking With Fire #
And that's pretty much it. Now whenever you email your custom domain, SES will that email body in an S3 bucket. This will in turn trigger the AWS Lambda function that's monitoring that bucket and it will push a commit to Github. Github will then notify Netlify whenever there's a new push. And finally, Netlify will redeploy your website with the latest changes.
I'll put up all the pieces in a repo with more detailed instructions someday, right now it's a bit hacky and it has information that could lead to my secret inbox being leaked. Until then, keep emailing!