Securing My WordPress Installation
There are over 300,000,000 results for the search term "how to secure WordPress site", and many of them give you decent tips on how to protect your existing WordPress installation. There could be some good tips there. But they won't really give you an answer to your actual question of "How do I run a WordPress installation while paying it the minimum amount of attention?". I asked myself this question as I dusted off this domain and started writing again.
Since many of my hobby websites have been compromised at one point or another (mostly due to my own error of not keeping them patched), I had some pre-requisites to running a personal website again.
 Photo by Nahel Abdul Hadi : https://unsplash.com/@nahelabdlhadi
 Pre-requisites #
- No server - I didn't want to maintain and patch the server or harden it.
- No self-hosting WordPress - Because it's so easy to write on, it's also the most popular editor and therefore a large threat target. And considering how many people run outdated installations, it becomes an even more attractive target.
- Little to no cost - Hobby project, so I don't want to throw down the big bucks.
- Editing should be on WordPress - It is just really easy to write on and the editor is very easy to use.
- Easy to operate - Because who wants excuses not to write?
Evaluated Options #
- Static site generators like Jekyll were the first thing I checked out. Rejected because it's not the WordPress editor.
- WordPress.com websites have decent pricing. But if you want more customization, it becomes more expensive.
- Medium.com was rejected because I wanted full control over my content.
- Self-hosted WordPress on a provider that specializes in WordPress hosting. This way I just needed to have the WordPress core and plugins updated. Rejected because plugins can still be an attack vector.
The Unhackable WordPress Installation #
After fiddling around with a couple of options, this is what I ended up with.
- WordPress running locally
- The Simply Static plugin to generate a static version of your site
- Netlify to deploy your static site
- Optionally, Disqus for enabling comments
- Optionally, Github for deploying and version control
 Photo by James Sutton
 Going back to my requirements, this setup matches up perfectly with what I want.
- WordPress isn't exposed to the Internet
- No need to run my own server
- WordPress for editing
- The only thing that costs money is the domain
The Nitty Gritty #
Bringing this setup to life is pretty straightforward. Let's go through them one by one.
WordPress Running Locally #
There's a couple of options available for you here. If you have Docker installed, you can grab the official WordPress image and set it up locally. You can also go for something like DevilBox which will give you a more complete development environment if you want to tinker with other sites as well.
While Docker is the easiest way to get going, it may not be for everyone. There are plenty of alternatives available though. You could use something like XAMPP, ScotchBox or set up your own development environment.
Once you have your environment running locally, get WordPress setup the way you like it and select a theme.
Install Simply Static WordPress Plugin #
Once you have WordPress installed, go to Plugins -> Add New and search for "Simply Static"
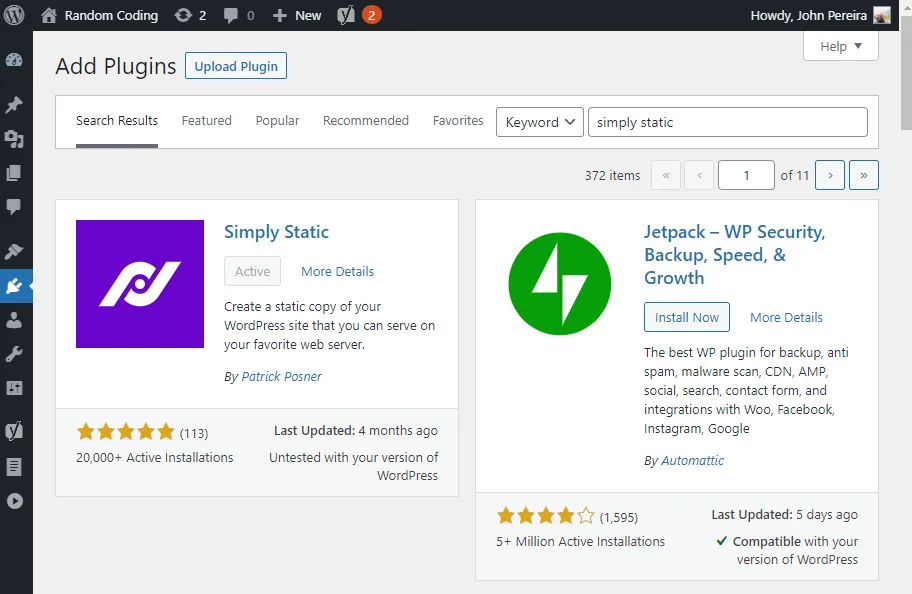 Add the Simply Static plugin
 Once you've added the plugin, go to Simply Static -> Settings on the sidebar to configure your plugin.
- Set your Destination URLs to the URL of your blog
- Set the Delivery Method to Local Directory and set the Local Directory value to the path of the directory that will contain your static files.
- Save your settings
Go to Static -> Generate on the sidebar and click on the Generate Static Files button. You should now see a bunch of HTML being generated. This is your website on static format.
Deploying to Netlify #
Netlify is just great! I use it on most of my static sites. It's very fast and it has a free tier. Sign up for a Netlify account. If you have a Github account you should connect it, we can use that later. Once you've created an account, use the upload option to deploy your website.
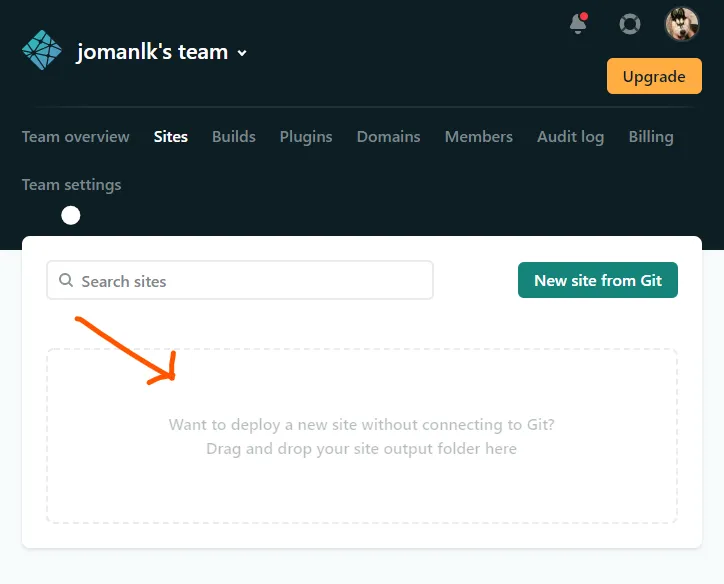 Drag your folder to this area
 When you drag your static folder to this area, Netlify will upload the files and deploy them for you. It will also assign a URL for you and you can use the URL to access your website. If everything went well, you should see something like the following image.
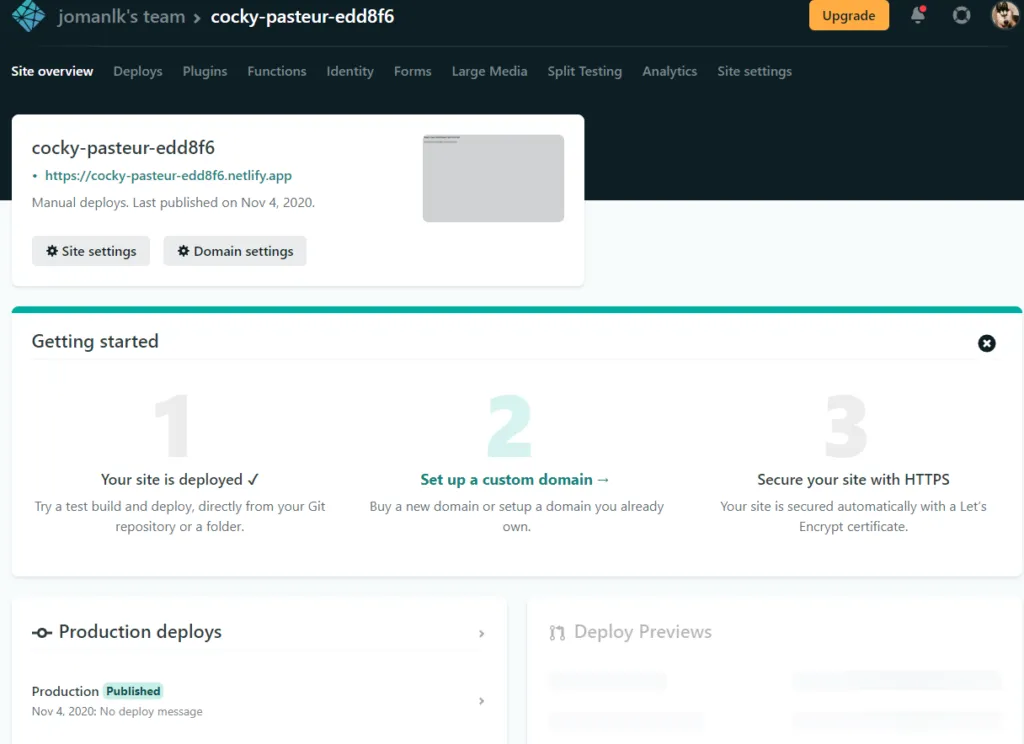 Netlify website that's ready to use
 You can use the 'Set up a custom domain' option to use your custom domain name instead of the one that Netlify assigned for you.
Icing on the Cake #
While the above setup works, it lacks a few things.
- No automated deploys - You have to manually deploy your website every time you make an update
- No commenting - There's no way for people to engage with you
- Search - You can't search for any of your old posts
To improve the deployment process, I created a repo for the website on GitHub and connected the repo with Netlify using the 'New site from Git' option. Make sure you correctly set the 'Publish directory' value, this should be the path of the directory that the Static Site plugin outputs to in relation to your GitHub repo root.
For commenting, one of the easier options is to sign up for Disqus. However, note that it has issues. If commenting isn't a big deal for you, I'd just leave it out. You can either install the Disqus WordPress plugin or since your site is running as a static site, you can install using the universal code.
For searching, Algolia is a viable option that you can set up. I haven't gotten to this part yet, but if I do get around to it, I'll be sure to do a write-up on it.
Wrapping Up #
And that's pretty much it. Your website is now online, it's very secure because it's just a bunch of HTML and no part of your editor is exposed to the Internet. While there are some negatives to this approach (the number of static files you generate will start growing VERY fast), it's a pretty good setup to get things going.
If you're familiar with WordPress, you can go ahead and customize it even further to fit your needs. Especially if you're running GitHub because you can just revert to an older version if something goes wrong.
Either way, have fun with your setup, and rest easy knowing that you don't have to worry about your website getting hacked anymore.
Photo by Markus Winkler on Unsplash