
Rapid Prototyping with Feathers JS and Docker
Rentman held a hackathon recently where the goal was to try out new tech and take on roles that you normally wouldn't. I mostly work with PHP in the back-end so thought I'd try out NodeJS with a framework that I was unfamiliar with, enter Feathers JS.
Feathers is a lightweight web-framework for creating real-time applications and REST APIs using JavaScript or TypeScript.
Build prototypes in minutes and production-ready apps in days.
https://feathersjs.com/
My experience with Feathers was fairly positive and so I thought I'd write a guide on how to get going fast and setup a prototype. In our guide, we'll use the example of creating a shopping list app (bit of a cliché, but oh well!).
The app should have the following features.
- Allow items to be added to the shopping list
- Allow items to be removed from the shopping list
- The shopping list should update in real time as items are added/removed
Pretty basic feature set, but a good start to test out the features available within the framework. Let's get to it!
Setting Up #
We need to get a couple of pieces in place before we can dive in, let's get those things out of the way now.
Prerequisites #
You're going to need the following to carry out this guide
- Docker to handle the database server
- NodeJS v10.0.0 or higher and matching NPM version
- Postman or a similar client to use the API we create
Create a Database Server #
Before we do anything on the application side, let's set up a database server so the application will have something to connect to. I'm going with MySQL and I'm going to use the official MySQL Docker image. The choice of DB doesn't really matter, as later on, you will see that Feathers has support for many databases out of the box. Run the following command to bring up a MySQL server via Docker.
# Creates and starts a Docker container and runs it in the background
docker run --name mysql-server -e MYSQL_ROOT_PASSWORD=password -d -p 3306:3306 mysql:latest

# Stops the container when you're done
docker stop mysql-server

# Starts up the container
docker start mysql-server
Once you have your container up and running, you can connect to it using your choice of MySQL client and see that it's all working. If everything looks good, create a database and a table for our application.
CREATE DATABASE shopping_list_db1;
DROP TABLE IF EXISTS items;
CREATE TABLE `items` (
	`id` INT NOT NULL AUTO_INCREMENT,
	`item` VARCHAR(255) NOT NULL,
	`quantity` VARCHAR(30) NOT NULL,
	`createdAt` DATETIME NOT NULL,
	`updatedAt` DATETIME NOT NULL,
	PRIMARY KEY (`id`)
)
COLLATE='utf8mb4_0900_ai_ci'
ENGINE=InnoDB;
Now, we're ready to move on to the next part.
Setup Feathers CLI #
Feathers has a handy CLI that can be used to quickly scaffold an app for you. So let's use that to set things up in a flash.
mkdir feather-shopping-list
cd feather-shopping-list
npm install @feathersjs/cli -g
feathers generate app
Feathers works flawlessly on Mac, Linux and WSL on Windows. It also (mostly) works running in Powershell, but you sometimes run into some weird permissions issues. I'll be doing this guide in Powershell so that I can document any quirks that you may run into. The commands are the same across all environments. Once you run feathers generate app it should ask you for the following information.
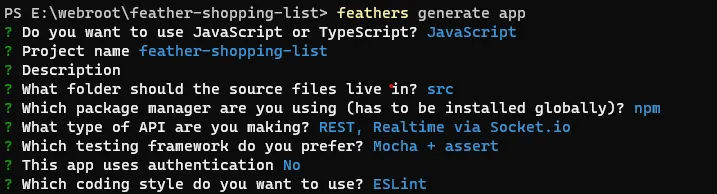 Feathers CLI setup steps
 We're going to skip authentication for now and just setup the app with the basics. If you run npm run start from within the app directory, you should see the app landing page.
 Landing page
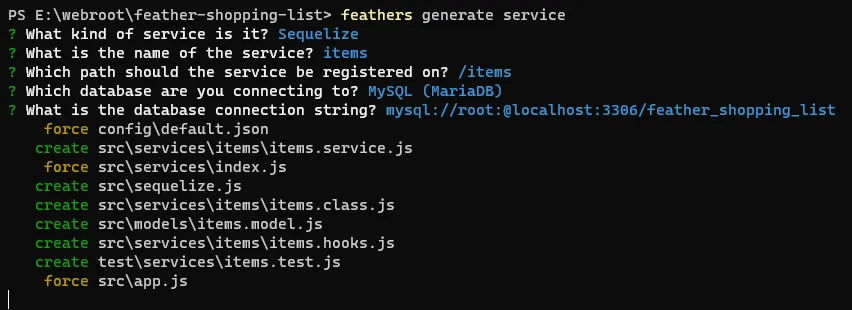
 Generating a Service with the Feathers CLI #
Services are the backbone of Feathers, it's where most of your code will reside. You can find out more about services on the Feathers docs page for services. Let's generate a service that will handle all our shopping items.
 Landing page
 There's a few things happening here, all of the values here are auto generated for you so you just need to make minor adjustments if needed :
- We use Sequelize ORM to handle the connectivity
- We give our service a name -
items - The URL path of the service is set
- We pick the database we want to connect to (we used MySQL in Docker, so we go with that)
- And finally, we give it the DB connection string. We'll accept the default for now as I'll show you how can change it.
If everything worked well, it should create all the files listed in the image above. Before we use them, let's make sure our app is connecting to the DB correctly. Open up the file config/default.json and look at the mysql attribute in the JSON file. That should look something like this
mysql://root:password@localhost:3306/shopping_list_db1
Generally this should be a NodeJS ENV value and should not be saved in a file that goes into your repository.
One final thing to do is to adjust the model definition that was created for us. Feathers does create a placeholder template for us when we generate services, but this needs a little bit of tuning. Open up the src/models/items.model.js file and make sure it looks like this :
// See http://docs.sequelizejs.com/en/latest/docs/models-definition/
// for more of what you can do here.
const Sequelize = require('sequelize');
const DataTypes = Sequelize.DataTypes;

module.exports = function (app) {
  const sequelizeClient = app.get('sequelizeClient');
  const items = sequelizeClient.define(
    'items',
    {
      item: {
        //both fields have been marked as required
        type: DataTypes.STRING,
        allowNull: false,
      },
      quantity: {
        type: DataTypes.STRING,
        allowNull: false,
      },
    },
    {
      hooks: {
        beforeCount(options) {
          options.raw = true;
        },
      },
    }
  );
  return items;
};
Now, if you open up http://localhost:3030/items you should see a JSON response
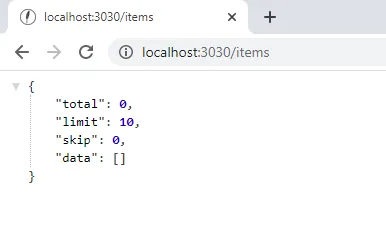 Response from your API
 If you get a response like above then you're all set and your application API is now running in just a few steps!
Preparing the Socket Connectivity #
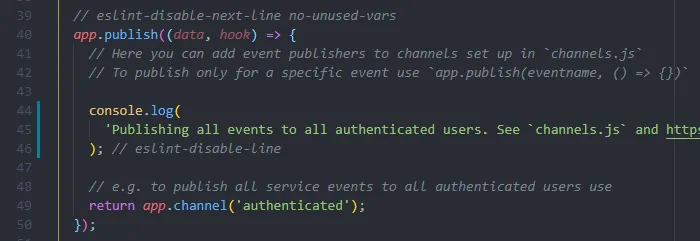 Default event publishing is restricted to authenticated clients
 By default Feathers only emits events to authenticated connections. Since we don't carry out any kind of authentication for this guide, we'll need to let Feathers know that it needs to send events to all the anonymous users. To do this. open the src/channels.js file and make that app.publish is configured like shown below.
  app.publish((data, hook) => {
    return app.channel('anonymous');
  });
Now that's done, we can go ahead and setup the frontend.
Create the Front-end #
Now let's give our application a front-end so that we can add/remove items to our shopping list. Replace the auto-generated landing page content inpublic/index.html with the following HTML.
<html lang="en">
  <head>
    <meta http-equiv="content-type" content="text/html; charset=utf-8" />
    <meta
      name="viewport"
      content="width=device-width, initial-scale=1.0, maximum-scale=1, user-scalable=0"
    />
    <title>FeathersJS Shoppping List</title>
    <link rel="shortcut icon" href="favicon.ico" />
  </head>
  <body>
    <div>
      <h2>My Shopping List</h2>
      <form action="#">
        <input id="itemAmount" type="text" placeholder="How many?" /> X
        <input id="itemName" type="text" placeholder="Of what item?" />
        <button id="addItem" type="submit">Add item</button>
      </form>
      <div>
        <ul id="list"></ul>
      </div>
    </div>

    <script src="//unpkg.com/@feathersjs/client@^4.5.0/dist/feathers.js"></script>
    <script src="//cdnjs.cloudflare.com/ajax/libs/socket.io/2.2.0/socket.io.js"></script>
    <script src="/script.js"></script>
  </body>
</html>
And now create public/script.js to house our client-side code. We'll go through section by section for the functionality.
Create the Client #
Firstly, let's add the initialization code to our script.js file. This should be at the top of your file.
// Establish a Socket.io connection
const socket = io();
// Initialize our Feathers client application through Socket.io
const client = feathers();
client.configure(feathers.socketio(socket));

// Add a global listener so we don't have to keep rebinding
const addMyEventListener = (selector, event, handler) => {
  document.addEventListener(event, async (ev) => {
    if (ev.target.closest(selector)) {
      handler(ev);
    }
  });
};
Fairly simple here, we create a Socket.io object and then let Feathers handle the integration of it. We also create a helper function to handle event binding that we will use later.
Next, we need to fetch any existing items in the database.
/**
 * Fetch all the existing items on load
 */
const getAllItems = async () => {
  const items = await client.service('items').find({ limit: 50 });
  for (let item of items.data) {
    addItem(item);
  }
};
getAllItems();
The above code just creates a function called getAllItems and then triggers it when the page loads. The function uses the created client to fetch 50 items from the database.
Now we'll put in the delete functionality.
/**
 * Remove an item when user clicks Remove link
 */
addMyEventListener('[data-remove-item]', 'click', async (e) => {
  e.preventDefault();
  client.service('items').remove(e.target.dataset.removeItem);
  e.target.innerHTML = 'deleting...';
});
This event handler looks for elements with data-remove-item as an attribute and binds the handler to it. When clicked, it takes the item ID and uses it to remove it from the DB.
Finally, we'll round things out by putting in the event handlers for the created and removed events. This is where the real time connectivity comes in as we listen for events being emitted by the socket server.
/**
 * Event handler for the item created event
 */
const addItem = (item) => {
  const list = document.getElementById('list');
  if (list) {
    list.innerHTML += `
      <li>${item.quantity} X ${item.item} -
          <a data-remove-item="${item.id}" href="#">Remove</a>
      </li>`;
  }
};
client.service('items').on('created', addItem);
The created event is triggered whenever a new item is added to the DB. We listen to this event and then append the newly added item to the list along with the data-remove-item attribute so that the early mentioned delete functionality can bind to it.
The last event we need to deal with is the removed event which triggers whenever an item is removed from the DB.
/**
 * Event handler for the item removed event
 */
client.service('items').on('removed', (item) => {
  document
    .querySelector(`[data-remove-item="${item.id}"]`)
    .closest('li')
    .remove();
});
Whenever this event is triggered, we simply look for a matching link and the find the closest list element and remove it from the DOM.
And that's it! Open up your application in multiple windows and carry out different actions and you'll see that all the windows will update to reflect the most current state. Feathers takes care of all the syncing and notifications for you.
Next Steps #
This was just a quick demonstration of the capabilities of Feathers. I've only spent a few days on this framework as yet, but I hope to write more about its features as I discover them.
The full codebase that I used for the demo is available here : https://github.com/jomanlk/feather-shopping-list